

Öncelikle yazıya başlamadan önce diğer yayınlarım için takip etmeyi unutmayın!
Hazırsak başlayalım;
Öncelikle terminalden bir veritabanı tablosu oluşturalım; Tablomuz "category" olsun.
php artisan make:migration create_category_tableBurada yaptığımız işlem neticesinde “app/database/migrations” dosyası oluşturulduğunu ve içerisinde modelleme yapıldığını göreceksiniz.
Bu dosyayı açtığımızda ise ;
<?php

use IlluminateSupportFacadesSchema;
use IlluminateDatabaseSchemaBlueprint;
use IlluminateDatabaseMigrationsMigration;

class CreateCategoryTable extends Migration
{
    /**
     * Run the migrations.
     *
     * @return void
     */
    public function up()
    {
        Schema::create('category', function (Blueprint $table) {
            $table->bigIncrements('id');
            $table->timestamps();
        });
    }

    /**
     * Reverse the migrations.
     *
     * @return void
     */
    public function down()
    {
        Schema::dropIfExists('category');
    }
}
?>
Bu kodu değiştireceğiz ve son çıktı aşağıdaki gibi görünecek.
<?php

use IlluminateSupportFacadesSchema;
use IlluminateDatabaseSchemaBlueprint;
use IlluminateDatabaseMigrationsMigration;

class CreateCategoryTable extends Migration
{
    /**
     * Run the migrations.
     *
     * @return void
     */
    public function up()
    {
        Schema::create('categories', function (Blueprint $table) {
            $table->bigIncrements('id');
            $table->string('title');
            $table->integer('parent_id');
            $table->timestamps();
        });
    }

    /**
     * Reverse the migrations.
     *
     * @return void
     */
    public function down()
    {
        Schema::dropIfExists('categories');
    }
}
?>
Şimdi veritabanı dosyamızı güncelledik sırada php için tabloyu oluşturmaya geldi.
Terminalden aşağıdaki satırı çalıştıralım;
php artisan migrateBu , veritabanında “ categories ” tablo adını oluşturur .
Şimdi Model dosyamızı oluşturalım.
Terminalden aşağıdaki komutu girerek çalıştralım.
php artisan make:model CategoryBu bize “app/Category.php” şeklinde bir model dosyası oluşturacaktır. Dosyamızı açtığımızda ise şu şekilde görünmesi gerekiyor.
<?php
namespace App;
use IlluminateDatabaseEloquentModel;
class Category extends Model
{
    //
}
Şimdi bu dosyayı aşağıdaki kodla aynı şekilde güncelleyin.
<?php

namespace App;

use IlluminateDatabaseEloquentModel;

class Category extends Model
{
      public $fillable = ['title','parent_id'];

    /**

     * Get the index name for the model.

     *

     * @return string

     */

    public function childs() {

        return $this->hasMany('AppCategory','parent_id','id') ;

    }
}
Şimdi Route tanımlayalım. “routes/web.php“. dosyamızı açalım ve aşağıdaki iki yolu tanımlayalım.
Route::get('category-tree-view','CategoryController@manageCategory')->name('category-tree-view');
Route::post('add-category','CategoryController@addCategory')->name('add.category');
Evet buraya kadar sorunsuz geldik. Bu aşamaya kadar;
1-) Veritabanı tablomuzu oluşturup isteğimiz doğrultuda güncelledik.
2-) Model oluşturduk ve değerleri tanımladık.
3-) Route ile yollarımız tanımladık.
Şimdi Controller yapımızı oluşturalım. Bunun için hemen terminal alanımızdan aşağıdaki komutu çalıştırıyoruz.
php artisan make:controller CategoryControllerBu bize “app/Http/Controllers” dizini altında CategoryController.php dosyası oluşturacak.
Dosyamızı açtığımızda aşağıdaki gibi görünecektir
<?php

namespace AppHttpControllers;

use IlluminateHttpRequest;

class CategoryController extends Controller
{
    //
}
Bu dosyamızı aşağıdaki gibi güncelliyoruz.
<?php

namespace AppHttpControllers;

use IlluminateHttpRequest;
use AppHttpRequests;
use AppCategory;

class CategoryController extends Controller
{
    /**
     * Show the application dashboard.
     *
     * @return IlluminateHttpResponse
     */

    public function manageCategory()
    {
        $categories = Category::where('parent_id', '=', 0)->get();

        $allCategories = Category::all();

        return view('category.categoryTreeview',compact('categories','allCategories'));
    }


    /**
     * Show the application dashboard.
     *
     * @return IlluminateHttpResponse
     */

    public function addCategory(Request $request)
    {
        $this->validate($request, [
            'title' => 'required',
        ]);

        $input = $request->all();
        $input['parent_id'] = empty($input['parent_id']) ? 0 : $input['parent_id'];

        Category::create($input);
        return back()->with('success', 'New Category added successfully.');

    }
}
Şimdi View zamanı....
Şimdi bir görünüm dosyası oluşturacağız, bu yüzden “app/resources/view” dizini altında bir category klasörü oluşturalım.
Bu klasörün içerisinde “categoryTreeview.blade.php” and “manageChild.blade.php” şeklinde iki adet dosyamızı oluşturuyoruz.
categoryTreeview.blade.php
<!DOCTYPE html>

<html>

<head>

    <title>Laravel Unlimited Hierarchical Category Tree View Example</title>

    <link rel="stylesheet" href="https://maxcdn.bootstrapcdn.com/font-awesome/4.6.3/css/font-awesome.min.css" />

    <link href="https://maxcdn.bootstrapcdn.com/bootstrap/3.4.0/css/bootstrap.min.css" rel="stylesheet">

    <script src="https://cdnjs.cloudflare.com/ajax/libs/jquery/3.1.1/jquery.min.js"></script>

    <link href="{{ asset('css/treeview.css') }}" rel="stylesheet">

</head>

<body>

<div class="container">

    <div class="panel panel-primary">

        <div class="panel-heading">Unlimited Hierarchical Category Tree View</div>

        <div class="panel-body">

            <div class="row">

                <div class="col-md-6">

                    <h3>Category List</h3>

                    <ul id="tree1">

                        @foreach($categories as $category)

                            <li>

                                {{ $category->title }}

                                @if(count($category->childs))

                                    @include('category.manageChild',['childs' => $category->childs])

                                @endif

                            </li>

                        @endforeach

                    </ul>

                </div>

                <div class="col-md-6">

                    <h3>Add New Category</h3>

                    <form role="form" id="category" method="POST" action="{{ route('add.category') }}" enctype="multipart/form-data">
                    @csrf

                    <div class="form-group {{ $errors->has('title') ? 'has-error' : '' }}">

                        <label>Title:</label>

                        <input type="text" id="title" name="title" value="" class="form-control" placeholder="Enter Title">
                        @if ($errors->has('title'))
                            <span class="text-red" role="alert">
                                <strong>{{ $errors->first('title') }}</strong>
                            </span>
                        @endif

                    </div>


                    <div class="form-group {{ $errors->has('parent_id') ? 'has-error' : '' }}">

                        <label>Category:</label>
                        <select id="parent_id" name="parent_id" class="form-control">
                            <option value="0">Select</option>
                            @foreach($allCategories as $rows)
                                    <option value="{{ $rows->id }}">{{ $rows->title }}</option>
                            @endforeach
                        </select>

                        @if ($errors->has('parent_id'))
                            <span class="text-red" role="alert">
                                <strong>{{ $errors->first('parent_id') }}</strong>
                            </span>
                        @endif

                    </div>


                    <div class="form-group">

                        <button type="submit" class="btn btn-success">Add New</button>

                    </div>


                    </form>


                </div>

            </div>


        </div>

    </div>

</div>

<script src="{{ asset('js/treeview.js') }}"></script>

</body>

</html>
manageChild.blade.php
<ul>

    @foreach($childs as $child)

        <li>

            {{ $child->title }}

            @if(count($child->childs))

                @include('category.manageChild',['childs' => $child->childs])

            @endif

        </li>

    @endforeach

</ul>
Şimdi CSS ve JS Dosyalırımızı oluşturalım.
Aşağıdaki css dosyasını “public/css” , js dosyasını ise “public/js” içine oluşturalım.
treeview.css
.tree, .tree ul {

    margin:0;

    padding:0;

    list-style:none

}

.panel-primary > .panel-heading {
    color: #fff;
    background-color: #606ec3;
    border-color: #606ec3;
}

.panel-primary {

    border-color: #606ec3;
    margin: 3%;

}
.tree ul {

    margin-left:1em;

    position:relative

}

.tree ul ul {

    margin-left:.5em

}

.tree ul:before {

    content:"";

    display:block;

    width:0;

    position:absolute;

    top:0;

    bottom:0;

    left:0;

    border-left:1px solid

}

.tree li {

    margin:0;

    padding:0 1em;

    line-height:2em;

    color:#369;

    font-weight:700;

    position:relative

}

.tree ul li:before {

    content:"";

    display:block;

    width:10px;

    height:0;

    border-top:1px solid;

    margin-top:-1px;

    position:absolute;

    top:1em;

    left:0

}

.tree ul li:last-child:before {

    background:#fff;

    height:auto;

    top:1em;

    bottom:0

}

.indicator {

    margin-right:5px;

}

.tree li a {

    text-decoration: none;

    color:#369;

}

.tree li button, .tree li button:active, .tree li button:focus {

    text-decoration: none;

    color:#369;

    border:none;

    background:transparent;

    margin:0px 0px 0px 0px;

    padding:0px 0px 0px 0px;

    outline: 0;

}
treeview.js
$.fn.extend({
treed: function (o) {
var openedClass = 'glyphicon-minus-sign';
var closedClass = 'glyphicon-plus-sign';
if (typeof o != 'undefined'){
if (typeof o.openedClass != 'undefined'){
openedClass = o.openedClass;
}
if (typeof o.closedClass != 'undefined'){
closedClass = o.closedClass;
}
};
//initialize each of the top levels
var tree = $(this);
tree.addClass("tree");
tree.find('li').has("ul").each(function () {
var branch = $(this); //li with children ul
branch.prepend("<i class='indicator glyphicon " + closedClass + "'></i>");
branch.addClass('branch');
branch.on('click', function (e) {
if (this == e.target) {
var icon = $(this).children('i:first');
icon.toggleClass(openedClass + " " + closedClass);
$(this).children().children().toggle();
}
})
branch.children().children().toggle();
});
//fire event from the dynamically added icon
tree.find('.branch .indicator').each(function(){
$(this).on('click', function () {
$(this).closest('li').click();
});
});
//fire event to open branch if the li contains an anchor instead of text
tree.find('.branch>a').each(function () {
$(this).on('click', function (e) {
$(this).closest('li').click();
e.preventDefault();
});
});
//fire event to open branch if the li contains a button instead of text
tree.find('.branch>button').each(function () {
$(this).on('click', function (e) {
$(this).closest('li').click();
e.preventDefault();
});
});
}
});
//Initialization of treeviews
$('#tree1').treed();
$('#tree2').treed({openedClass:'glyphicon-folder-open', closedClass:'glyphicon-folder-close'});
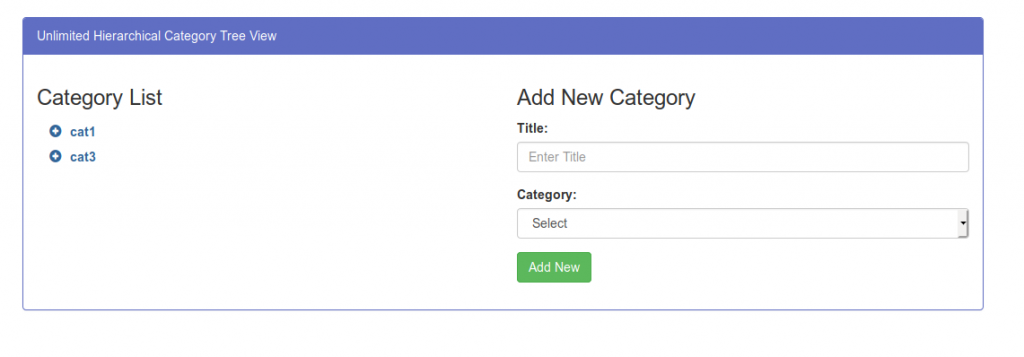
$('#tree3').treed({openedClass:'glyphicon-chevron-right', closedClass:'glyphicon-chevron-down'});Neredeyse bitti şimdi artık sitemizin ön izlemesini açalım; Benim çalışma dizinime göre aşağıdaki linkten ön izlememi açıyorum.
http://localhost/laravel-hierarchical-category/public/category-tree-view
Kaynak : https://codescompanion.com/laravel-unlimited-hierarchical-category-tree-view/
GitHub : https://github.com/pringal/laravel-unlimited-hierarchical-category-tree-view
